Thursday, March 26, 2009

Precious Love

Photobucket
Supplies Needed


Tube of choice. I am using the gorgeous artwork of Barbara Jensen. To use her work you must purchase a license HERE at Erotic Artist Gallery. This is a free tube offered by Barbara Jensen on her site. Thanks Barbara. Free Scrap Kit Precious Love can be found at CinnamonScraps HERE. Deemask1 by me can be found in my supplies HERE. Font of choice.
Plugins Used.
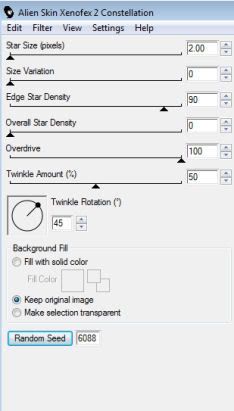
Xenofex2 - Constellation
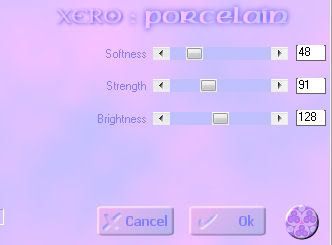
Xero- Porcelain

Let's get started.
Open a new image 600X600 and floodfill with white.
Add a new raster layer and floodfill with a color from your tube or kit.
Apply Deemask1 Layers/load/savemask/load mask from disc.
Layers - Merge Group.
Copy and paste frame 3 from the kit. Duplicate it twice. Rotate one 12 left, the other 12 right.
Make sure they are behind your straight frame.
Click inside your straight frame with your magic wand. Selections/modify/expand by 7.
Copy and paste a paper from the kit-selections-invert-hit delete on your keyboard. Put the paper behind your straight frame.
Do the same with your rotated frames,using another paper of choice from your kit.
Copy and paste your tube as a new layer. Make it so her head is above your center frame and erase any over hang on the bottom.
I added the xero porcelain plug in to my tube using the following settings:
Photobucket
Copy and paste the beaded heart as a new layer above your mask layer. Use your raster deform tool to stretch it vertically so it comes a bit below your frame.
Resize 75% and copy and paste your floral branches on each side of your center frame. Add some leave accents which I resized to 30%.
Resize bow 1 30% and place over your floral branch.
Copy and paste flower 3 and place in the top left corner above your mask layer so it shows a bit. Do the same for the lower right corner.
Copy and paste gem 2 and place it over the large flower in the left corner. Duplicate and mirror.
Resize flowers of choice to 40% and place on the lower corners or your frame.
Resize heart charm 1 70% and copy and paste as a new layer. Place it in the upper right hand corner of your frame.
Add your copyright info, if using the same tube as I am..even though it is free, you must obtain a Barbara Jensen license to use it.
Add your watermark and name. I put eyecandy 4000 gradient glow around my name.

Animation
Duplicate your heart charm layer 2 times for a total of 3.
Take your freehand selection tool (the lasso) and draw
carefully around the pink gems in the heart charm.
X out your top 2 heart charm layers. Highlight the first and apply Xenofex 2 constellation with the following settings:
Photobucket
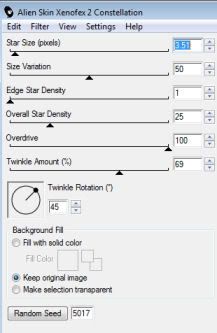
X out of your first charm layer and open the second and repeat constellation but change the random seed.
X out of your second layer and open the 3rd and repeat, changing random seed.
X out of your 3rd, and open the first once again. Selections-select none and copy your tag merged to animation shop.
Do the same with the second and third charm layers and paste after current frame in animation shop.
Run your animation and save as a gif!
I hope you enjoyed this tutorial.
Dee

Bathtime Luxuries

Photobucket
Supplies Needed
Tube of choice. I am using the beautiful artwork of PinUpToons. To use his artwork you must purchase a license at CILM. Free Scrap kit Bathroom Freebie Kit can be found HERE Mask07 by Vix HERE. Window included in supplies, but the credit goes to EssexGirl. Towels HERE

My Supplies HERE
Let's Get started!
Open a new transparent image and floodfill with white.
Resize 17% the wooden paper layer and copy and paste as a new layer. Apply Vix_Mask07 to this paper layer and merge group.
Copy and paste the deefloor tube as a new layer and move it under your mask and arrange as if it is the flooring of your bath.
Resize the sg_dark wood frame included in my supplies and copy and paste as a new layer.
Move to the middle of your mask layer.
Click inside the frame with your magic wand on each side, holding down your shit key.
Selection-Modify-Expand by 5. Add a new raster layer and flood fill the selection with #c2e8ee. Move this layer under your window frames.
Copy and paste the chrismist_japanese_garden misted tube or one of choice over your selected window frames.
Selections-Invert-hit delete on your keyboard. Move this under your window frame as well but above your "sky" layer.
Reduce the opacity to 95% on the misted tube.
Resize the bathtub 20% and copy and paste as a new layer.
Copy and paste your main tube as a new layer.
If using a similar one sit her on the edge of the tub.
Resize lace6 20% and copy and paste as a new layer and place it on the top of your window frame as a valance.
Erase the overhang on each side. Resize, copy and paste bath sign, and elements of choice.
I used the basket, some towels, bath salts etc.
Crop and resize your tag as desired. Add your copyright info, watermark and name.

Animation:
Copy your tag merged into animation shop and paste as a new animation.
Open the bubbles gif. Duplicate your tag so it has 8 frames.
Activate your bubbles, edit-select all-copy.
Activate your tag Edit-select all-paste into selected frame.
Place your bubbles where you like them.
Run your animation and if happy save as a gif!
I hope you enjoyed this tutorial!
Hugs,
Dee

I Love Denim

Photobucket

I am using the beautiful artwork of Barbara Jensen. To use her work you must purchase a license HERE at EroticArtistGallery.com. Freebie Scrap Kit I Love Denim by Seachell available HERE. Mask WSL_Mask105 by WeeScotLass is HERE.
Plugin Xenofex 2 Constellation

Animation Shop
Font Used: Monika Italic
Let's Get Started!

Open a new image 600x600, floodfill with white.
Copy and paste paper 10 from the kit.
Apply WSL_Mask105 and merge group.
Copy and paste the frame and click inside with your magic wand tool. selections-modify-expand by 15
Copy and paste paper paper 3-selections- invert-hit delete on your keyboard and move this layer under your frame.
Copy and paste your tube, leave the head slightly above the frame and erase any overhang from the bottom of your tube so it looks like it sits inside the frame.
Dropshadow your tube.Resize heart 1 from your kit 50% and paste as a new layer. Use your raster deform tool to rotate it how you wish.
Resize heart 2 from your kit 35% and paste as a new layer, rotate like the other. Duplicate this heart and move to the bottom right of your tag..resize it again if needed. ( I did 90%)
Add a drop shadow of choice to both.
Resize bow 35 percent and paste to your liking.
Resize and paste flowers of choice and arrange them on the left side of your frame.Resize and paste butterflies of choice around your tag.
Resize wordart 20% and place on your paper.
Crop and resize your tag to your preferences. Add your copyright info and watermark.
I used the font Monika Italic for my name.
Animation
Duplicate your paper layer 2 times for a total of 3 layers.
X out the top 2 on your original apply Xenofex 2 constellation with the following settings
Photobucket

Do the same for your other 2 layers, changing the random seed on each.
X out the top 2 again and copy merged into animation shop-do the same with the other two X'ed out layers and paste after current frame.
View your animation.
I hope you enjoyed this tut!
Dee

Charleston

Photobucket


Supplies Needed:

Tube of choice. I am using the wonderful artwork of PinUpToons. To use his work, you must purchase a license at CILM. Free Scrap Kit Feng Shui by Tantrum Scraps aka Amanda. Amanda has granted tutorial writers permission to include her beautiful kits in our supplies. Thank You. Her site is HERE. OtherworldFae Mask 2 by Sabre HERE. My supplies HERE.
Let's Get Started!
Open a new blank image 600X600 and floodfill with white.

Copy and paste paper 19 as a new layer.

Apply otherworldFaeSabremask2 to the paper layer. Layers-load/save mask/load mask from disc. Merge group.

Copy and paste the Feng shui lace as a new layer over your mask.
Copy and paste the feng shui frame as a new layer.
Click inside your frame with your magic wand. Selections-modify-expand by 7. Copy and paste a paper of choice from the kit as a new layer.
Selections-invert-hit delete on your keyboard. Bring this paper under your frame layer. Deselect.
Click once again in your frame and expand by 7.
Copy and paste a close up of your tube as a new layer.
Arrange so the face is in the frame. Selections-invert- delete. Bring under your frame. Change the blend mode of this tube to Luminance Legacy.

Copy and paste your main tube to the side of the frame.
Resize 80% and copy and paste Doodle flower 2 as a new layer. Move to the right side of your frame.
Duplicate the doodle and mirror.
Resize fans of choice 50% and copy and paste as a new layer.
Use your raster deform tool and rotate them slightly. See my tag for reference.
Resize 80% the flower brad and copy and paste as a new layer.
Put the flower brads on the bottom of the fans.
Resize a bow of choice 80% and copy and paste as a new layer. Move to the top of your frame.
Drop shadow all pieces except the lace. Resize your tag to desired size.
Add your copyright info, watermark and name.
I used the font LainieDaySH for my name and added a medium gradient glow.

Animation:

Copy your tag merged into animation shop and paste as a new animation.
Duplicate your tag once for a total of 2 layers, (the same as the butterfly)
Activate the butterfly, select all, copy- activate your tag, select all-paste into selected frame.Place where you desire.
Run your animation and save as a gif!
I hope you enjoyed my tutorial!

Hugs,

Dee